Walter Breen's Encyclopedia of Early United States Cents
Walter Breen
Fortunately, this was not the only company interested in the contract for planchets, and Boudinot ordered a like amount from Matthew Boulton of Birmingham, with whom the Mint would have preferred to do business. Boulton's delivery record was even worse; the planchets did not arrive until late August 1797. They were, however, everything the Mint had hoped for, and were cheaper than those of Governor & Company.
In 1797 a second shipment from Governor & Company, which was as bad as the first, put the matter to rest. While there would be some initial delivery problems (some due to the Napoleonic Wars), Boulton became the Mint's main supplier for nearly 40 years. This relationship was interrupted only twice-first by the War of 1812, and again in the early 1820s when the Mint, angered by a series of damaged shipments and late deliveries, turned to another English supplier, (Doty, pp. 63-65. Boulton & Co. paid less than strict attention to their packaging and shipping practices resulting in several damaged shipments. Late shipments were also somewhat of a chronic problem. As a result, the Mint turned to its other British supplier, Belles & Harrold, who had been a secondary supplier since 1816.) With the development of domestic sources of supply, the Boulton era would come to an end in 1837. In total, Boulton was responsible for approximately two-thirds of the planchets used to strike large cents from 1797 through 1837.
Early Die Sinking Procedures
To produce a coin with its images in relief, or raised above the field, the die had to be made with its devices-portrait, lettering, date, and other details-incuse, or sunk below the field, and mirrored left-to-right when compared with the struck coin. The designs could be engraved into each die by hand, but this process was extremely laborious and severely limited the number of dies that could be produced. The preferred method was to create an image of the central devices (heads, wreaths, etc.) in relief just as on a finished coin, and use this punch or "hub" to impress the design into a die. The peripheral devices-lettering, date, and border details-were then added by means of individual punches. (Voigt hand-cut all of the heads for the 1793 Chain cents. The chain on the reverse was entered by repeated hand punching with a single link element. The heads for the Wreath design and the wreaths were likewise hand-cut. With the inception of Wright's 1794 Liberty Cap design, the Mint began using hub punches for both the head and the wreath. Hubbing the full design (all elements except the date) would elude the Mint until 1835, discussion follows.)
The first step in creating a die by either means was to make a sound die body. To do this, the die forger had to select a suitable mass of steel, heat it to "red heat" and, while hot, forge it into the proper size and shape, taking care that the forging contained no laps or seams. Once forged, the die was annealed and thoroughly cleaned.
While this process sounds quite simple, in practice it was very difficult and took a great deal of experience. Unfortunately, at its inception, the Mint had no one in its employ with any substantive experience in forging dies. Direct experience was the only way to learn; metallurgical texts on the processes and methods did not exist.
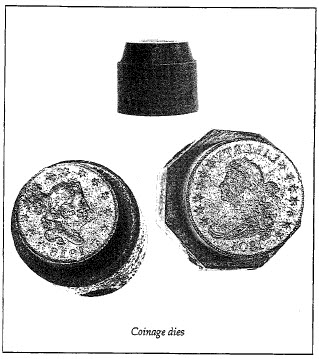
This lack of experience was especially troublesome during the first seven years; many dies cracked during hardening or early in use. In 1795, with the hiring of Adam Eckfeldt as the die forger and turner, the situation began to improve. While Eckfeldt was by no means an experienced die forger, he was an accomplished blacksmith, and this experience paid off. The average die life for the next four years was double that of the year previous to his employment. Eckfeldt continued to refine his forging techniques over the next several years. Dies in the American Numismatic Society collection show a clear evolution from the rather crudely formed and machined 1803 half eagle and 1805 half dollar to the superbly made 1806 half dollar and 1818 cent dies illustrated below. With this improvement there was a concomitant rise in die life. By the late 1820s, die life of the cents would reach a very respectable average of 300,000 strikes per die. (For a full discussion of these problems, see Craig Sholley, "Inexperience, Not Die Steel, Caused Problems At Early U.S. Mint", Penny-Wise, March 1996.)
If the die body was to be used for a hand-engraved die, the area that would form the die face was turned to a diameter slightly larger than that of the finished coin and the face finished to a very slight convexity. If the die were to be hubbed, it would be turned to a shallow cone (initially, the rest of the die body was left in the as-forged shape; later, the entire die body would be turned on a lathe-see the illustration of the ANS dies). The die body would then be cleaned again and passed to the hands of the engraver.
To hand-cut a die, the engraver would first trace the layout onto the surface of the die, and then, using various gravers, gouges, and scribers, cut the major designs into the die. Punching in or cutting the letters, numerals, and border details then completed the die. The die would then be lapped to remove any extraneous metal pushed up by the engraving and punching. (The term "lapped" refers to the grinding and polishing of a die. Dies were lapped during the die-making process, and also after use to repair damage, such as clash marks, to the die face.)
It has long been thought that the letters, numerals, etc. were entered using hand-held punches. However, the accuracy of the punching, and the fact that this was often performed by apprentices, along with a Mint record of the purchase of a "punching machine for the engraver" indicate that some kind of fixture was used to hold the punches. Recent experience in reproducing early coining dies at the Gallery Mint Museum likewise supports this conclusion. (Stewart, p. 174, warrant dated July 20. Ron Landis, "The Missing Link", Gallery Mint Report, Vol. 2, Issue 1, July 1995, p. 4.)
For hubbed dies, a die blank would be placed in the anvil position" of a heavy screw press and opposite this, the hub containing the design to be imparted. The die blank would be given one or two blows, annealed, and the process repeated until the design was fully impressed. The die would then be ground to remove the excess metal pushed during the hubbing process and finished off the same as in the hand-cut process.